
This post contains affiliate links. We may earn compensation when you click on the links at no additional cost to you.

Are you like me and you are in disbelief that the holiday season is upon us?
Each year I find myself wondering how we got here so quickly! It is officially November and in about three weeks we will be celebrating another Thanksgiving with family and friends and lots of good food!
To get in the spirit of the upcoming holiday, Michelle is here today to share how she made an easy Thanksgiving Pennant Banner.
Here is what you need to make a banner of your own:
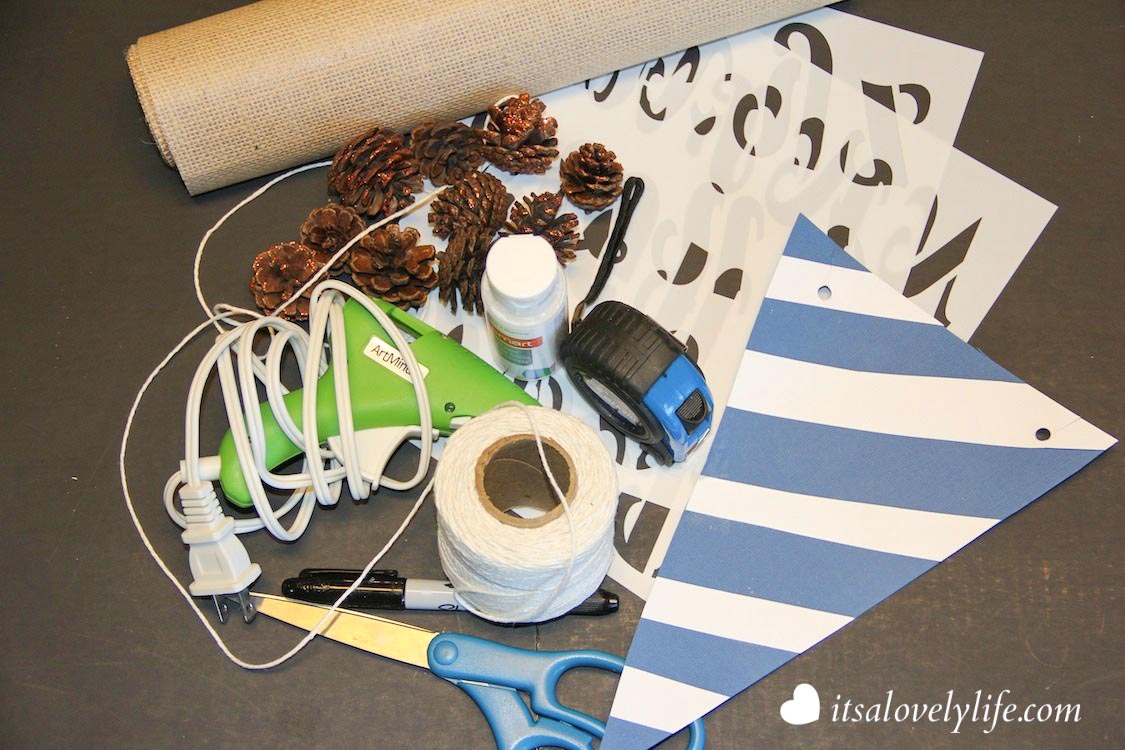
- Burlap
- Stencils
- Pennant Flag Stencil
- String
- Scissors
- Sharpie
- Hot Glue Gun
- Tape Measure
- Acrylic Paint
- Sponge Paint Brush
- Paint Brush
- Embellishments
Step One:
Trace triangles using your flag stencil (you can easily make this with cardstock to the appropriate size for your space) on the burlap with a pen, drawing your triangles right side up and upside down alternatively. Note: keep in mind you will be folding over the tops of your triangles when determining size.

Step Two:
Cut out the triangles and measure about an inch from the top and fold it down. Cut off the excess.

Step Three:
Place the stencil in the middle of the triangle and using the sponge paintbrush dab paint onto the stencil to form the letter. I spelled out the word “thanks”. Feel free to get creative! You can spell out Thanksgiving, thankful, or any other form of the word thanks for that matter! Be sure to use a color of paint that will contrast well with your burlap. I played it safe with white but if you are feeling daring go with an orange or a deep brown.

Step Four:
Use the paintbrush to touch up any areas where more paint is needed.
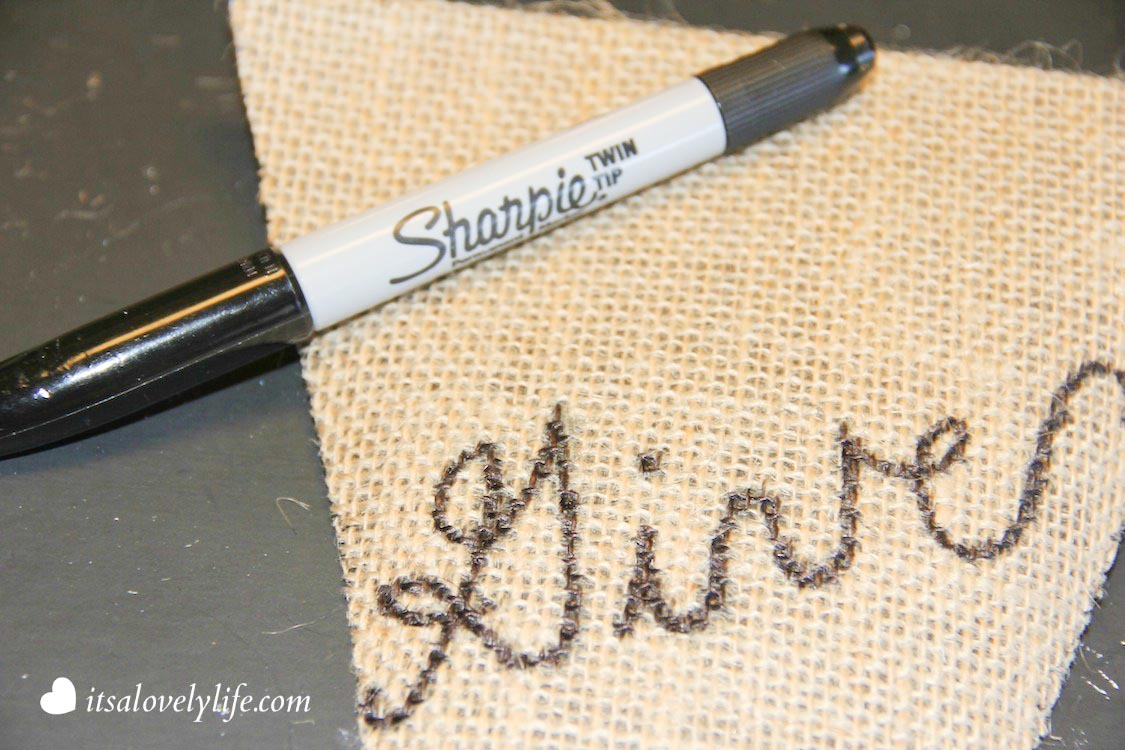
Step Five:
If you choose to make a banner similar to mine, use a permanent marker to write out the word “give”. I went the easy route and just free handed it (hey, it gives it my own personal touch) but you can always use stencils if you wish.

Step Six:
Once your painted letters have dried, you are now ready to assemble the banner. Place the string under the folded inch at the top.
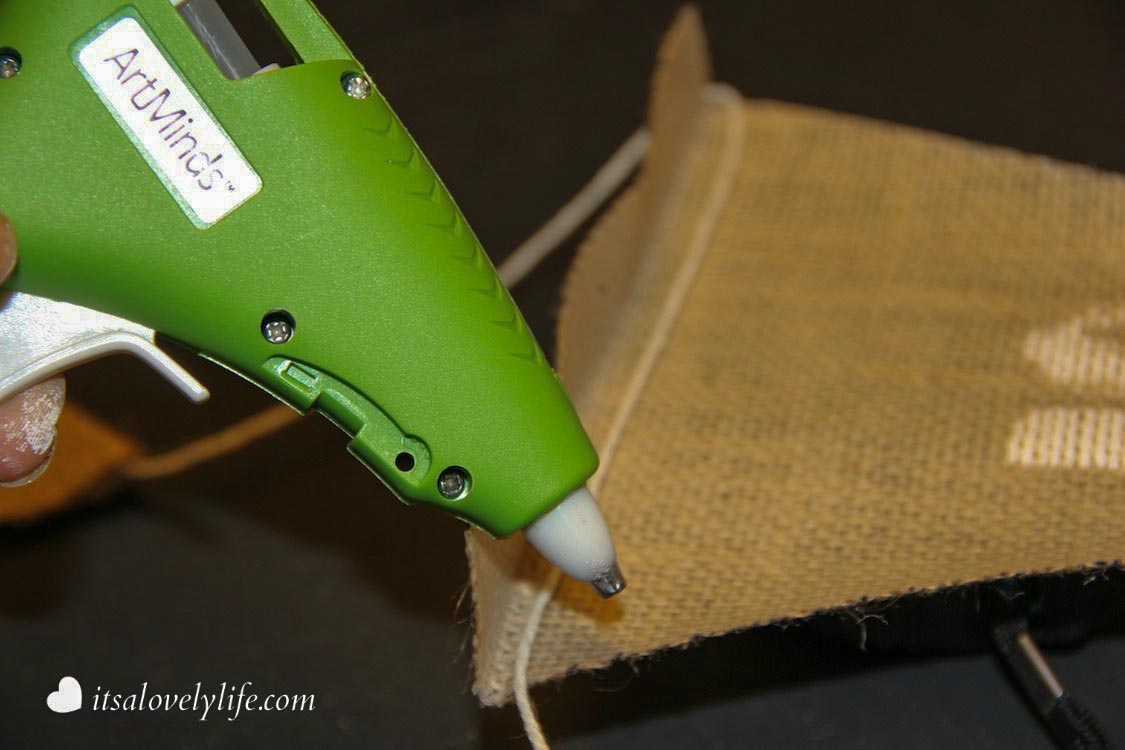
Step Seven:
Using a hot glue gun, glue the burlap down over the string in such a way that you can move the pendants around.

Step Eight:
This last step allows you to use your imagination to embellish the banner according to your own creativity.
I chose mini pine cones and fake fall leaves on every other pendant, I like the earthy feel of those elements along with the burlap.

Once dry, hang your banner on your mantle or wherever you please.
You can space your pendants out easily by sliding along the string. My banner is up and is a constant reminder to me that whether I believe it or not it is already that time of year where we reflect on the many blessings in our lives!
Tell me something you are Thankful for this Thanksgiving???


That came out so good. I love how easy it is to make.
What a great project! It’s super cute and super easy. Those are my two top criteria. =D
That’s surprisingly simple. I especially like that you can save it for year after year.
Nice and simple, and it gives a very nice look! It really looks like something i saw in the craft store recently.
This is a great way to decorate for all the different Holidays. I have so many ideas now. It looks great.
Omg love it!!! So very cute and creative
This looks so simple, even I could do it :-). I love that you used pinecones and faux leaves — I love bringing the outdoors inside as decor!
What a cute Banner! Thank you for the tutorial!
Oh that looks beautiful! Burlap seems to be a popular thanksgiving material to decorate with. It looks pretty versatile. Beautiful job!
That is such a great idea. So festive and fall looking.
I adore banner crafts. As a side note, you have such beautiful cursive writing!
I love it how you can get creative with that burlap. I think you can always paint it so it will be colorful.
Thanks for sharing this. This is exactly the kind of mother daughter friendly project that I keep an eye out for.
I love the banner!! It’s super cute!! Nice diy!
I am excited for Thanksgiving. It’s so near.
I’m pretty excited to celebrate my first American Thanksgiving this year. We’re from Canada – so we’re kinda stoked! Lol.
Love the artistic little addition of the pinecones! Bringing elements from the outside in is one of my favorite ways to decorate!
This is so cute! I need to get on top of this and get one made for the upcoming holiday!
That is a beautiful pennant. I love that you used burlap.
Thats really nice! I don’t really think about Thanksgiving decorations every year, but that is something I would do!
That’s awesome! You can use dried flowers too.
There’s just something about how burlap looks that I find very appealing! What a cute banner for the holidays!
I love how that banner turned out.
Very nice! I love it.
we don’t officially celebrate thanksgiving but I am especially thankful for my son’s new special school. people are loniing up to enter and we are lucky to get a slot. we’ve been attending since October.
great DIY decor – really love the rustic appeal!
I love how you made this decor – really neat and wonderful!
That is so adorable and so easy to DIY. You know, I see this every year and I still haven’t been able to make a Fall Thanksgiving Bunting. I have some Burlap and I haven’t done anything to it yet since I bought it. Thanks for sharing your easy DIY Thanksgiving Bunting/Banner.
That is so cute and looks really easy to do, too!
This is an awesome idea. I love this and looks great along with being creative. I would love to do this with the kids. Thanks for sharing.
How cute is this! I absolutely love it!
OMG I have so much burlap laying around! I have been saving it for a project I actually like instead of this ugly wreath I made 🙂 Love it!!!
What a great project! I love that there’s no sewing on the edges of the fabric. That’s always a plus.
So easy even I could do it. 😀
It turned out so nice. I love that you used burlap, that’s perfect for Fall!
Love this! Rustic chic at its best!
I love this idea! You can adapt it to other holidays as well!
Super cute! This Thanksgiving Pennant Banner is just what my mantle needs 🙂 I’m pinning this!!!
I love decorating for fall and Thanksgiving. This banner is so cute!
What an awesome craft project. I’ll have to add this to my holiday crafts to do list.
This turned out so well! It would look great by my fireplace.
I want to make this!
That is great. I might have to make one of these this year.
I love how easy and beautiful this is! Now, if only I had a mantle……..
Gave me a good idea of what to do on my empty wall 🙂 Thanks so much for your creativity.